

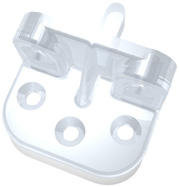
Original Fastener for all your solid edge boards. Available in 4 convenient spacing options!!
 |
Features
- Compatible with Composite, Hardwoods, Treated (Including the new ACQ treated lumber), Cedar, and Vinyl.
- Made of DURABLE CLEAR, UV Resistant, Lexan™ equivalent material that can be painted.
- Unique Overhang Tabs for hands free attachment.
- Boards can be easily removed if damaged.
- Exceptional holding power.
- Proper gapping with the built on spacer, creates confidence that the decking boards will not be compromised by improper spacing.
- Easy to install for the average homeowner.
- Can even be used for stair construction.
|
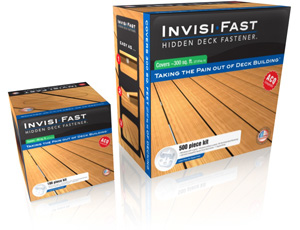 |
Invisi-Fast Hidden Deck Fastener Kits
500 Pc Kit
Includes 440 pieces with a spacer, 60 pieces without a spacer (for first & last board fastening), 1500 ACQ Compatible Square Drive Deck Screws, 1 Square Driver.
Covers approx. 300 sq. feet.
Kits available:
Kit with ACQ Screws
Kit with Stainless Steel Screws
100 Pc Kit
Includes 88 pieces with a spacer, 12 pieces without a spacer (for first & last board fastening), 300 ACQ Compatible Square Drive Deck Screws, 1 Square Driver.
Covers approx. 60 sq. feet.
Kits available:
Kit with ACQ Screws
Kit with Stainless Steel Screws
*Certain variables may change amount of coverage per kit. |
Invisi-Fast Installation
For a printable version of the following steps, click
here. [PDF 224 kb]
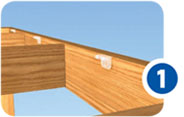 |
Prior to first board installation
Step 1: Starting from the outside, attach the Invisi-Fast™ with no spacer between each joist. *Install first board with proper overhang and secure using the top holes (Deck Board Holes) of the Invisi-Fast™ fastener.
|
|
* For a more sound deck and to prevent squeaks, we recommend applying a 3/8” bead of Silicone or Construction Adhesive along joist before installing Invisi-Fast™ hidden deck fastener to help fill in voids and imperfections on the mating surfaces between the joist and deck boards. Not applying adhesive will not compromise stability. This practice is very common. It is the same as if you were to install the floor decking on every house built. They install an adhesive to keep the decking from squeaking. Especially outside where the temperature change allows for expansion and contraction of the deck boards.
|
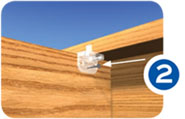 |
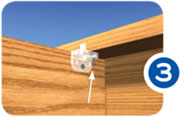
Step 2: Using the Invisi-Fast™ with spacer, slide the convenient Overhang Tabs under your first deck board for hands free attachment. Then, using an approved deck screw, fasten the Invisi-Fast™ to the joist using a lower hole.
We recommend one screw to be fastened into the joist. The other 2 holes are to be used as backups (if wood imperfection is present.) |
 |
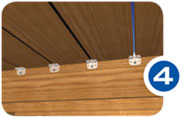
Step 3: Secure the deck board by using the corresponding upper hole. Slide your second board into place. Secure deck board by using the remaining upper hole.
Continue this process for the length of the joist.
Note: When 2 boards meet each other on a joist, install an Invisi-Fast™ on each side of the joist. |
 |
Step 4: Repeat this process until the last deck board.
Note: Prior to securing the final board, cut your board to size if necessary. Using the Invisi-Fast™ without a spacer, secure the Invisi-Fast™ to the inside perimeter board (rimboard) using the lower hole. Then once all perimeter fasteners are secure, fasten your final deck board using the upper deck board holes. |
|
 |
For 16" on center decks, use our handy 16" Calculator to find the right amount of Invisi-Fast Hidden Deck Fasteners for your project. Calculation is an estimate and does not apply to the Invisi-Fast Plus Fastener.
For 12" on center decks, use our 12" Calculator. |
Using Construction Adhesive
Construction adhesive acts as an insulator, helping eliminate squeaking and creaking after your deck boards have settled, so your deck will sound solid years after installation. Depending on which exterior construction adhesive is required for your climate area, the adhesive also provides additional holding power.
Natural Wood Spacing Tip
It's really a personal preferance. You can choose to go with a spacer if want to pregap your boards or a no spacer. We are findng that when no spacers are used the deck boards shrink about 1/16". This is on the field testing we have completed, and from contractor feedback. Alot of people prefer this while others would prefer to pregap the deckboards. There is no wrong way to install treated or cedar boards, just whatever your preferance may be.
**Use No-Spacer or 1/8" for Treated, Cedar or Redwood Decks. In some instances, you may decide to go with 1/4" to allow pine needles and tree seeds to fall through the gaps.
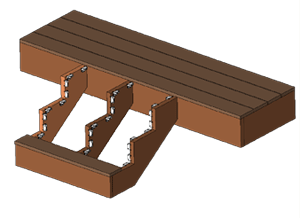
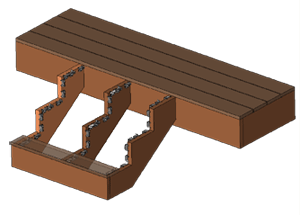
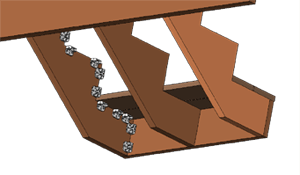
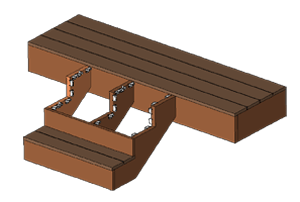
Using Invisi-Fast Hidden Deck Fasteners for Stair Construction
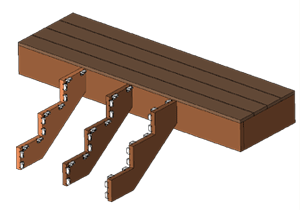 |
Step 1: Begin by installing Invisi-Fast with no spacer to front of risers and front and back of treads like picture above. |
|
 |
Step2: Install first riser by cutting board to length and screwing Invisi-Fast with no spacer (which is already installed) to riser. |
|
 |
Step 3: Install first tread by cutting board to length and screwing Invisi-Fast with no spacer(which is already installed) to first tread board. |
|
 |
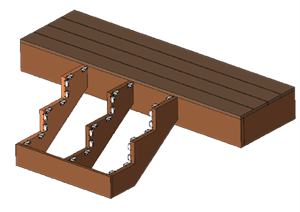
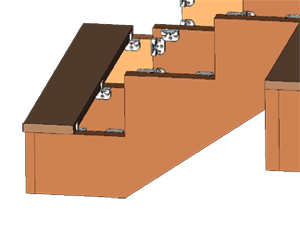
Step 4: Install Invisi-Fast with correct spacing for decking to backside of last deckboard installed. Refer to the image below. |
 |
|
|
 |
Step 5: Install last tread board to step by screwing front of deckboard to Invisi-Fast with spacer and back of deckboard to Invisi-Fast with no spacer which was installed in Step 1. |
|
 |
Step 6: Repeat all prior steps to complete step tread and riser installation. |
|
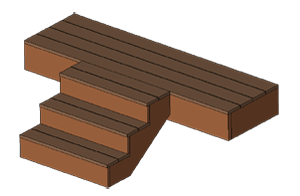 |
Step 7: Your finished stair installation.
Questions? Contact Us. |
Please be sure to check with your composite deck manufacturer for proper deck board spacing when using the Invisi-Fast™ Hidden Deck Fastening System.
Use necessary safety precautions when installing Invisi-Fast™ Hidden Deck Fasteners.
Patent Pending |
| |